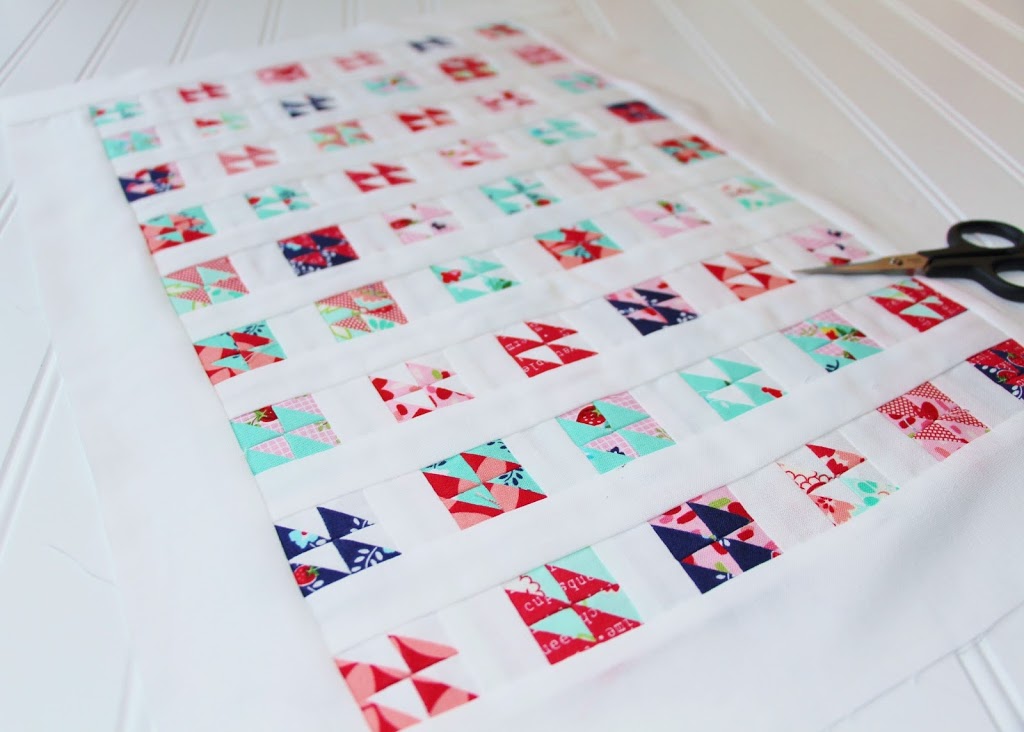
I’ve come to the conclusion that there is a fine line between scrap usage and insanity. This is a line I am willing to test, repeatedly.
In my last post, I shared a quilt I made for my baby niece. When I began making the blocks, I noticed that there are a lot of triangles that are cut off as waste. And being a scrappy quilter by nature, I just couldn’t relegate them to my scrap bin, to never be found again, to become distorted or to be lost.
From the get go, I decided to stitch a second seam 1/2″ away from the the first seam on the edge that was to be cut away. That way, when I cut off the parts that the block no longer needed, I would already have a tiny little half square triangle block, ready to be pressed, ironed and trimmed.
I found that while some blocks could handle being trimmed to 1 1/4″, it was safer to trim them all to 1″. Each Shimmer block generated 24 half square triangles. And there were nine blocks total in the quilt I made, so if I just kept it up and didn’t flake on this, by the end I would have as many as 216 HSTs. The thought was really exciting.
(Mini anything has always appealed and I have been itching to make a mini for my wall.)
While I stitched through my niece’s quilt, I kept pondering the layout. To sash or not to sash? Single HSTs or grouped HSTs? If grouped, how big a group? If sashed, how big? Round and round I went.
I trimmed all my HSTs using my Bloc Loc ruler and about half way through, realized I could do multiple (as many as 5), at a time in one layout. (See my instagram account if interested in a video of this.) This definitely saved time and I’ll be using this procedure again for sure.
Eventually, I decided on groupings of four HSTs of the same type. After sorting all my HSTs, I realized that regardless of the color of the HST, each sorted group had an amount based on a multiple of 4. And I wanted to use up all my little hard earned blocks, so groups of 4 was the way to go.
Once I decided that, I made a quick plan of doing 54 groups of 4 blocks (216 total), which would work out to a nice layout of 6 blocks by 9 blocks.
I decided on using a sashing of 1 1/4″ width for in between the blocks. Each HST finished at 1/2″ square, making the 4 patch block 1″ square finished. The sashing between would finish at 3/4″. I did an outer sashing of 2″ unfinished.
I am beyond thrilled that this turned out EXACTLY as I hoped.
Now to decide on quilting…
Linking up with Crazy Mom Quilts for it finish it up Friday.

All I can say is WOW!
Love it!! There is no way I could ever do this! Great job!
Absolutely love it!
This is fabulous! You are so brave for taking on these tiny triangles! The results though, wow!
Absolutely beautiful!
This is amazing, I love it!
Such tiny blocks, amazing!
So very pretty, but such a lot of work!!
This is just darling!! Crazy. But darling!
Lovely project with scraps, like you I like to stitch that extra line. Unlike you I have not produced an amazing project from it!
You must be very calm and patient, great work!
Jade, I really admired your miniature quilt when you showed it at the VMQG meeting. I would never have the patience to work with such small pieces! I encourage you to enter this in the Miniature category in the Quilt Canada juried show. http://njs.canadianquilter.com
And I thought I handled tiny pieces–which were cut offs from a different project–but no, they were nothing in line with these tinies (tinys?)! The did make a great mini, though, and you put them together in an innovative block. Beautiful finish!